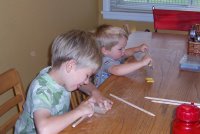
We started with two 4ft x 1/2in. dowells. We cut these dowells into three sets of 11" each and one set of 15" (the longer ones are hard for the littles to maneuver, so that set will be my needles).

 Then we sanded them and sanded them, trying to remove ALL rough spots which might catch our hand-dyed wool.
(Note: the kids were doing this on one of our "pajama days" -- can't do that in "real school"! Also, Lego Maniac is hard at work with his tongue stuck in the corner of his mouth while BamBam is still trying to figure out exactly what we're doing and String Bean is trying to look surprised that I've got the camera out!
 The next step was to oil the wood -- this keeps the needles smooth and protects from cracks forming from the dry climate. We let the oil soak into the wood. We then each chose different buttons to place on the ends of our needles (primarily so we could know whose was whose!). You can also used beads or make ends with sculpey or other oven-drying clay, but we just wanted to use some fun buttons.
String Bean and I chose Austrian buttons, Lego Maniac chose square ceramic buttons and BamBam chose school buses. We glued these one with super glue and let them sit till we were sure they were good and done.
 Our final bouquet of needles!


 ...
... 


3 comments:
This is such a neat project! I love the finished needles. They would make a wonderful gift for any knitter!
These look like a lot of fun to make and use...
I really like this idea!
Thank you for sharing it!
Post a Comment